
From Clutter to Cloud: Your Ultimate Guide to Uploading Files to Google Drive
Google Drive: We have all been there. You are staring at a cluttered desktop, an overflowing downloads folder, or a mountain of paper on your desk. Consequently, the mental load of managing all those digital and physical files can become overwhelming. However, what if you could make it all disappear? I am not talking about magic; rather, I am talking about getting organized.
Therefore, let us demystify the process of uploading to Google Drive. This is not just about moving files; instead, it is about reclaiming your digital sanity. In this guide, we will walk through the nuts and bolts of uploading, share some power-user tips I have picked up along the way, and address the security concerns that often hold people back. Moreover, we will use the active voice and keep things simple, so you can finally take control of your data.
What is Google Drive, and Why Use It?
First of all, think of Google Drive as your digital filing cabinet. It lives in the cloud, which means you can access your photos, documents, and videos from your phone, laptop, or tablet as long as you have an internet connection. Furthermore, the best part is that you can also access your files offline if you know the right settings. Whether you are using it for work, school, or simply to back up family photos, it offers a secure and convenient way to store your life’s data. For this reason, millions of people around the world rely on it daily.
The Basics about Google Drive: How to Upload Files (The Easy Way)
Let us get right into the action. Here is how you get your files from your computer into the cloud.
1. The “New” Button Method
This is the most direct approach.
- Step 1: Firstly, open your browser and head to drive.google.com.
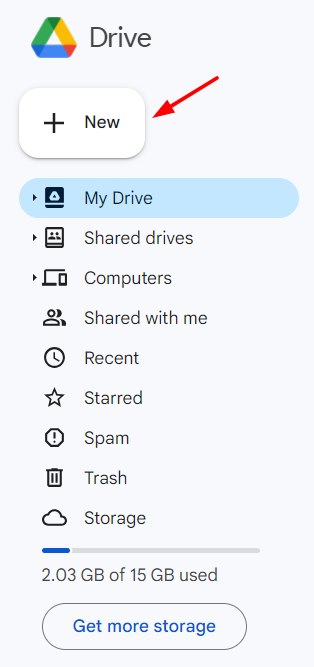
- Step 2: Secondly, look to the top left corner. You will see a button that says + New. Click it.
- Step 3: Thirdly, a drop-down menu will appear. You will see options for creating new folders or uploading.
- Step 4: Then, choose File Upload if you have just one or two documents. If you want to move an entire folder of pictures, choose Folder Upload.
- Step 5: Finally, your computer’s file finder will pop up. Browse your files, select the ones you want, and click Open.
The upload will begin. You will see a small progress bar in the bottom right corner of your screen. Wait for it to say “Upload Complete,” and your files will appear in your Drive.
2. The Drag-and-Drop Method (My Favorite)
This method feels intuitive and quick. It is probably the easiest way to upload files, but it only works in newer browsers like Chrome, Firefox, or Edge.
- Step 1: Firstly, Open drive.google.com.
- Step 2: Secondly, open the folder where you want to store the new files.
- Step 3: Then, find the file or folder on your computer desktop or File Explorer window.
- Step 4: Finally, click and hold the file with your mouse, drag it over the Google Drive window, and release it.
Boom. The upload starts immediately. For a visual guide on how this works, many educational institutions provide excellent tutorials.
The Mobile Method: Uploading from Your Phone
We capture everything on our phones. Here is how to get those images and videos into Drive.
- Step 1: Firstly, download the Google Drive app from the Apple App Store or the Google Play Store.
- Step 2: Secondly, open the app and sign in.
- Step 3: Thirdly, look for the + (plus) icon at the bottom of the screen. Tap it.
- Step 4: Then, select Upload or File Upload.
- Step 5: Navigate to the photo or document in your phone’s storage and tap it to begin the upload.
Pro Tip: You can scan physical documents directly using the app. Instead of selecting “Upload,” look for the Scan option. The camera will open, and you can take a picture of a receipt or form. Google Drive will automatically crop it and convert it into a clean PDF. This is a game-changer if you are trying to go paperless.
Advanced Tools: Google Drive for Desktop
If you are managing massive amounts of data, you should install “Drive for Desktop.” This application creates a special Google Drive folder on your computer’s file system.
- The Magic: Anything you drag into this folder automatically syncs to the cloud. It is like having a bridge between your computer and the internet.
- The Benefit: Then, you can work on files inside this folder just like you would with any other file on your computer. When you save the document, the changes upload to the cloud in the background. It is seamless.
Troubleshooting Common Issues
Is your upload stuck? Do you see an error message? Do not panic. Here is how to fix it.
1. The Never-Ending Upload
Sometimes, uploads take forever. This usually comes down to two things: your internet connection or the file size.
- Check Connection: Ensure you have a stable Wi-Fi connection. If you are using mobile data, make sure the app is allowed to use it. Usually, there is a setting to restrict uploads to Wi-Fi only, so check that off.
- File Size Limits: Free Google accounts get 15 GB of storage shared between Drive, Gmail, and Photos. If you are trying to upload a 264GB video file, it will fail. You have to split large files into smaller chunks (like 100GB pieces) to upload them successfully. If you are using a school or work account, there might be size limits set by your administrator as well.
2. The “Same Name” Dilemma
What happens if you upload a file that has the same name as one already in your Drive?
Google Drive usually uploads the new file as a new version of the existing file. This helps edit drafts. However, if you want to keep both files side-by-side, look for a pop-up option that says “Keep both files.” Click that to avoid overwriting your work.
Security & Strategy: Smart Upload Habits
Uploading files is the first step. Keeping them safe is the next.
1. Organization is Key
Do not just dump everything into the root folder.
- Create a System: Build a folder system that makes sense to you. For example, “Personal > 2025 > Taxes” or “Work > Projects > [Project Name].”
- Naming Conventions: Then, use descriptive file names. Instead of “Document1.pdf,” use “Tax_Return_2025.pdf.” This makes searching a breeze.
2. Security Settings
When you share files, be careful.
- Avoid “Anyone with the Link”: Unless you are sharing a public document, avoid this setting. Restrict access to specific people.
- Enable 2FA: Two-Factor Authentication is your best friend. Then, it asks for a code from your phone in addition to your password. This stops hackers even if they guess your password.
- Check Third-Party Access: Periodically check your Google Account settings to see which apps have access to your Drive. Revoke access from apps you do not use anymore.
Frequently Asked Questions (FAQ)
Q: Can I upload a folder to Google Drive?
A: Absolutely. On the web, click + New and select Folder Upload. In the desktop app, drag the folder into the Drive folder.
Q: How much storage does Google Drive have?
A: For free, you receive 15 GB of storage. This space is shared between Drive, Gmail, and Google Photos. You can purchase more if you need it.
Q: How do I upload if I have a slow internet connection?
A: This can be frustrating. Try using the Google Drive app on your phone to upload smaller files. You can also set the upload to occur only on Wi-Fi to avoid data charges, though you might have to be patient. For extremely large files, you might need to use a public Wi-Fi location to get a faster speed.
Q: What happens if I lose my internet connection while uploading?
A: Most of the time, Drive will pause the upload. Once you reconnect to the internet, it will resume from where it left off, so you do not have to start over from scratch. For desktop users with the Drive app, you can work offline, and the files will sync once you are online again.
Q: Is it safe to upload sensitive documents?
A: Google encrypts your files while they are being uploaded and while they are stored on the servers. However, for maximum safety, ensure you use a strong password, enable Two-Factor Authentication (2FA), and do not share the files with the public.
Q: How do I upload files to a shared team folder?
A: This works just like uploading to a personal folder. Navigate to the “Shared Drives” section in the left-hand menu. Once you are inside the shared drive, you can click + New or drag-and-drop files just like you would in “My Drive”.
The Bottom Line
Firstly, uploading to Google Drive is a skill that saves you time and protects your data. Whether you choose the basic “New” button method or the sleek drag-and-drop, the process is designed to be user-friendly.
Then, take a moment today to organize one folder. Clear that desktop clutter and drop it into the cloud. It is a small step that leads to a much calmer, more organized life. Good luck, and happy uploading