Introduction
Video content is everywhere today. You see it on social media. You watch it on websites. Then, you even receive it in emails. However, not everyone can afford expensive editing software. That is where Clipchamp changes the game.
Clipchamp is a free video editor. Specifically, Microsoft now owns it. As a result, you can access it directly in your browser. Alternatively, you can download it as an app. Moreover, it works on Windows 11 and Windows 10. Best of all, it keeps things simple.
In this blog, you will learn exactly how to use Clipchamp. In addition, you will discover what you need to know before starting. Then, finally, you will see real ways to make money using this tool. Therefore, let us dive right in.
Part 1: What Is Clipchamp? A Quick Overview
Clipchamp is an online video editor. More importantly, it focuses on ease of use. Consequently, you do not need any previous experience. Likewise, you do not need a powerful computer. In fact, the software runs smoothly on most devices.
Here is what makes Clipchamp special:
- For starters, it offers drag-and-drop editing.
- Secondly, it includes free stock videos and audio.
- Thirdly, it supports basic transitions and filters.
- Furthermore, it exports videos in high quality (up to 4K).
- Finally, it integrates directly with Microsoft tools.
Transitioning to the next point, you need to understand the system requirements. Fortunately, they are very low. As a result, any laptop or desktop from the last five years works fine.
If you want to read about how to make 3d animated movie, click here.
Part 2: How to Use Clipchamp – Step by Step
Let me walk you through the actual process. First of all, follow these steps carefully. In doing so, you will edit your first video in under ten minutes.
Step 1: Access Clipchamp
To begin, open your web browser. Then, search for “Clipchamp.” Next, click the official Microsoft link. Alternatively, find it in your Windows Start menu. For your information, the app comes preinstalled on Windows 11.
Step 2: Create a Free Account
After that, click “Sign in.” Then, use your Microsoft account. If you do not have one, create it for free. In fact, the entire process takes less than two minutes.
Step 3: Start a New Project
Now, click the “Create new video” button. Then, choose a blank project. Afterward, name your project something memorable. For example, “First Tutorial Video.”
Step 4: Import Your Media
Next, click the “Import media” button. Then, select video clips from your computer. You can also drag files directly into the window. Moreover, Clipchamp accepts MP4, MOV, AVI, and many other formats.
Step 5: Add Clips to the Timeline
After that, drag each video clip down to the timeline. Then, arrange them in your preferred order. Subsequently, use your mouse to trim the start or end of any clip. Hover at the edge and drag left or right.
Step 6: Cut Out Mistakes
Now, click on a clip in the timeline. Then, move the playhead to the bad section. After that, click the scissor icon to split. Finally, delete the unwanted part. As a result, this action removes errors cleanly.
Step 7: Add Transitions
Next, open the “Transitions” tab on the left side. Then, drag a transition between two clips. For instance, fade and slide transitions work best for beginners. However, keep them short, around half a second.
Step 8: Insert Text or Titles
After that, click the “Text” tab. Then, choose a title style. Next, drag it above the timeline. Now, type your message. Additionally, easily change the font and color. Finally, position the text anywhere on the preview screen.
Step 9: Adjust Audio Levels
Then, click on any audio clip. Afterward, drag the volume slider up or down. Moreover, you can also add background music. For example, Clipchamp provides free stock audio. Just click the “Audio” tab and browse.
Step 10: Export Your Video
Finally, click the “Export” button at the top right. Then, choose 1080p for most online platforms. After that, wait a few seconds for processing. Then, click “Save to computer.” As a result, your video is ready.
As you can see, the entire workflow is straightforward. Therefore, even a complete beginner finishes within minutes.
Part 3: What You Need to Know Before Using Clipchamp
Before you start making money, however, understand the limitations. Here is the truth.
The Free Version Works Well, But…
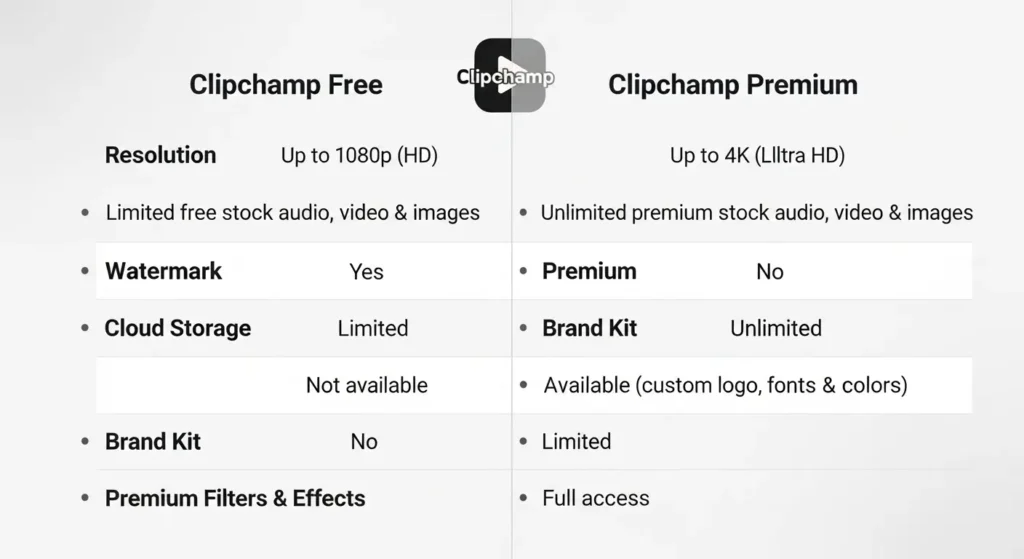
For the most part, you can use Clipchamp for free forever. Nevertheless, some features require a paid plan. For example, premium filters and stock assets need a subscription. On the other hand, the free version still includes plenty. In fact, most beginners do not need paid features at all.
Export Quality Is Good but Not Perfect
Clipchamp exports videos quickly. Moreover, the compression works fine for YouTube and TikTok. However, for professional filmmakers, minor quality loss might appear. Still, for social media content, this rarely matters.
Internet Connection Matters
Because Clipchamp runs in a browser, you need a stable internet connection. In fact, a slow connection causes lag during editing. If this happens, download the desktop app. As a result, the offline version works much faster.
You cannot edit 4K Videos Easily on Old Computers
The software supports 4K export. However, editing 4K files requires decent hardware. Therefore, on an old laptop, stick with 1080p. Consequently, your editing experience will stay smooth.
Transitioning to the exciting part, let us talk about money. So, how can you turn this free tool into real income?
Part 4: How to Make Money Using Clipchamp
Clipchamp is not just for hobbyists. In fact, you can earn serious money with it. Below are practical methods. Moreover, each one uses active voice and clear steps.
Method 1 Clipchamp: Create YouTube Tutorials
First, teach people what you just learned. Then, record your screen while using Clipchamp. After that, show the editing process step by step. Next, upload these tutorials to YouTube. Finally, monetize your channel with ads.
Action steps:
- First, choose a specific topic (for example, “How to add text in Clipchamp”).
- Then, record your screen using OBS Studio (free).
- After that, edit the recording with Clipchamp itself.
- Next, upload to YouTube.
- Finally, enable monetization once you reach 1,000 subscribers.
Method 2: Sell Short Video Clips
Similarly, businesses need short videos for social media. In fact, they pay good money for quick edits. Therefore, use Clipchamp to create 15 to 30-second clips. Then, sell them on platforms like Fiverr or Upwork.
What you need to do:
- First, record simple stock-style footage using your phone.
- Then, edit each clip in Clipchamp.
- After that, add text overlays and background music.
- Next, export in vertical format (1080×1920).
- Finally, list your gig for 10–30 per video.
Method 3: Edit Videos for Local Businesses
Now, walk into any local restaurant or shop. Then, offer to make a 60-second promotional video. For this service, charge per 50 per video. Afterward, use Clipchamp to add their logo, hours, and contact info.
Your workflow:
- First, film clips on your phone (no fancy camera needed).
- Then, trim the footage in Clipchamp.
- After that, add their business name as a title.
- Next, insert soft background music.
- Finally, deliver the final file within 24 hours.
Method 4: Create Online Course Content
Additionally, many coaches and teachers need help editing course videos. Specifically, they record long lectures. Then, they pay editors to cut out mistakes and add visuals. Fortunately, Clipchamp handles this perfectly.
How to start:
- First, join teaching platforms like Teachable or Thinkific.
- Then, offer editing services to course creators.
- After that, charge $15 per finished hour of video.
- Finally, use Clipchamp’s text tool to add chapter markers.
Method 5: Make Faceless YouTube Channels
Furthermore, faceless channels are very popular. In this method, you use stock footage and voiceovers. As a result, no one needs to see your face. Moreover, Clipchamp makes this process extremely easy.
Your step-by-step plan:
- First, pick a niche (history, facts, true crime, motivation).
- Then, download free stock footage from Pexels or Pixabay.
- After that, record your voiceover using your phone.
- Next, drag everything into Clipchamp.
- Then, add background music from the free audio library.
- Finally, upload to YouTube and earn ad revenue.
Method 6: Produce Social Media Ads
Likewise, small businesses run Facebook and Instagram ads. Unfortunately, many cannot afford expensive editors. That is where you fill the gap. Therefore, use Clipchamp to create punchy, effective ads.
Simple formula:
- First, ask the client for raw clips or images.
- Then, arrange them quickly on the timeline.
- After that, add bold text that highlights their offer.
- Next, export as MP4.
- Finally, charge a flat $25 per ad.
As you can see, the opportunities are endless. In conclusion, Clipchamp gives you professional results without expensive software.
Part 5: Pro Tips to Maximize Your Earnings
Let me share some advanced advice. These tips come from real experience. Therefore, use them to stand out.
Always Overdeliver
First, send the client one extra version of the video. For example, provide both a square and vertical format. As a result, this small action earns five-star reviews.
Learn Keyboard Shortcuts
Clipchamp supports basic shortcuts. For instance, use Ctrl+C to copy. Similarly, use Ctrl+V to paste. Also, use the delete key to remove clips. Consequently, speed means more projects per day.
Batch Your Work
Set aside three hours every Monday. Then, edit five short videos in that single sitting. In fact, batching saves mental energy. Moreover, it also increases your hourly earnings.
Create Templates
First, build reusable Clipchamp projects. Then, save one template for YouTube intros. After that, save another for Instagram Reels. Finally, swap the clips. As a result, you finish projects twice as fast.
Frequently Asked Questions (FAQ)
Q1: Is Clipchamp really free?
Yes. The basic version is completely free. Moreover, you can export videos without watermarks. In addition, you never see forced ads inside the editor.
Q2: Do I need a powerful computer?
No. Clipchamp runs on most laptops. However, if your device is very old, use the desktop app instead of the browser version.
Q3: Can I use Clipchamp on a Mac?
Yes. First, open your browser on any Mac. Then, visit the Clipchamp website. As a result, the tool works perfectly on macOS.
Q4: Does Clipchamp add a watermark?
Not in the free version. Therefore, your exported videos stay clean. In fact, no logos or watermarks appear.
Q5: How much money can a beginner make?
Generally, you can earn 300to500 per month part-time. On the other hand, full-time editors make $2,000 or more. Still, it depends on how many clients you find.
Q6: What if I have never edited videos before?
That is fine. In fact, Clipchamp teaches you as you go. First, start with one 5-minute tutorial on YouTube. Then, edit your first video in under an hour.
Q7: Can I add my own fonts and music?
Yes. First, upload any font file. Similarly, upload your own MP3 music. In both cases, Clipchamp supports them.
Q8: Is Clipchamp good for professional work?
For social media and basic commercials, yes. However, for Hollywood movies, no. Therefore, choose the right tool for the right job.
Conclusion
In summary, Clipchamp puts professional video editing into everyone’s hands. First of all, you do not need money. Secondly, you do not need experience. Finally, you need a computer and a few minutes of practice.
Now you know exactly how to use it. In addition, you understand the key limitations. More importantly, you have six real methods to make money.
Therefore, stop waiting. First, open Clipchamp today. Then, edit your first video. After that, offer your service to someone who needs help. Finally, your journey starts right now.