Introduction
The Raspberry Pi 5 is here, and it’s making waves with its impressive speed, expanded memory options, and flexible connectivity. Whether you’re a hobbyist, a student, or a professional, this guide will walk you through setting up your Raspberry Pi 5, optimizing its performance, and answering the most common questions all in clear, active language.
Why Choose Raspberry Pi 5?
Raspberry Pi 5 stands out with a Broadcom BCM2712 quad-core Arm Cortex-A76 processor running at 2.4GHz, making it up to three times faster than its predecessor. Additionally, with RAM options up to 16GB, dual 4Kp60 HDMI outputs, and a new in-house RP1 I/O controller, it’s designed for power users and professionals who need a compact yet robust computing solution.
If you want to read about Edge AI, Click Here.
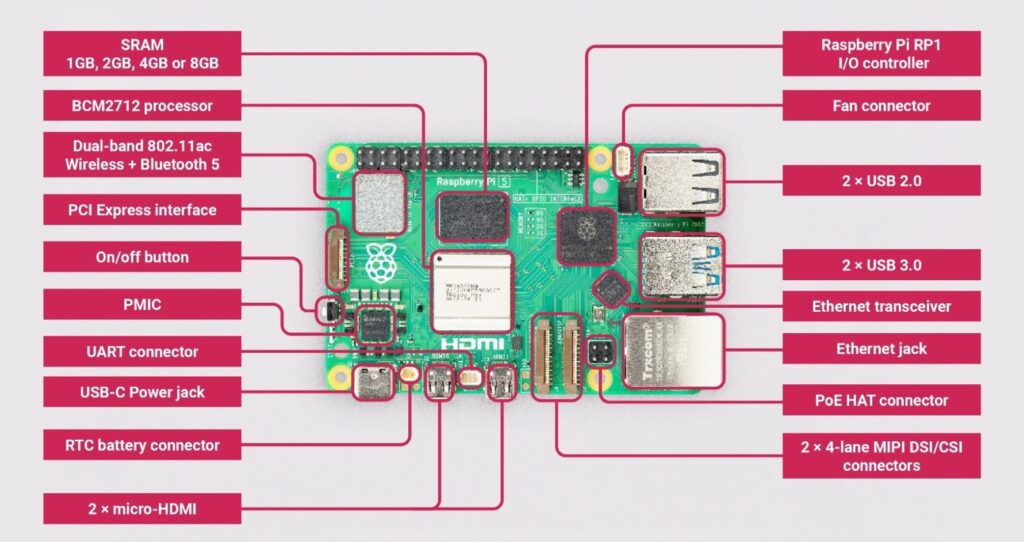
Raspberry Pi 5: Essential Features at a Glance
- Firstly, quad-core 64-bit Arm Cortex-A76 CPU @ 2.4GHz
- Secondly, RAM: 1GB, 2GB, 4GB, 8GB, or 16GB LPDDR4X
- Thirdly, dual 4 Kp60 HDMI display outputs
- Fourthly, 800 MHz VideoCore VII GPU
- Then, gigabit Ethernet, dual-band Wi-Fi, Bluetooth 5.0/BLE
- 2 × USB 3.0, 2 × USB 2.0 ports
- PCIe 2.0 x1 interface for high-speed peripherals
- 40 GPIO pins for hardware projects
- Finally, a Real-time clock and a power button for convenience
Getting Started: Step-by-Step Setup
Setting up your Raspberry Pi 5 is straightforward. Here’s how you can get started quickly:
What You’ll Need:
- Firstly, the Raspberry Pi 5 board
- Secondly, a Micro SD card (preferably high-speed, at least 16GB)
- Thirdly, an SD card reader
- Fourthly, an Official Raspberry Pi 5 power supply (5V/5A recommended)
- Then, Keyboard, mouse, and monitor
- HDMI to micro-HDMI cable
- Finally, a Case and active cooler (recommended for better performance)
Step 1: Prepare the SD Card
- Insert your SD card into the reader and connect it to your PC.
- Download and install the Raspberry Pi Imager from the official website.
- Select Raspberry Pi 5 as your device, choose the operating system (Raspberry Pi OS is a great start), and select your SD card as the storage.
- Then, set up your username, password, and Wi-Fi credentials.
- Flash the OS onto the SD card and safely eject it when done.
Step 2: Assemble and Connect Hardware
- Place your Raspberry Pi 5 in its case and connect the fan or active cooler.
- Attach the keyboard, mouse, and monitor using the micro-HDMI adapter.
- Insert the prepared SD card into the Pi.
- Connect the power supply and turn on your Raspberry Pi 5.
Step 3: First Boot and Update
- On first boot, the setup wizard will guide you through basic configurations.
- Open the terminal and run: text
sudo apt update sudo apt upgradeThis ensures your system is secure and up to date.
Raspberry Pi 5 Essential Tips for a Smooth Experience
- Use the Official Power Supply: The Pi 5 requires more power than previous models. Using the official 5V/5A supply ensures stability, especially if you plan to connect power-hungry peripherals or use SSDs.
- Choose Fast Storage: For best performance, use a high-quality micro SD card or, even better, connect an M.2 SSD via the PCIe interface for super-fast boot and data transfer.
- Cooling Matters: The Pi 5 runs hotter due to its powerful CPU. Always use an active cooler or a case with a built-in fan to avoid thermal throttling.
- Keep Software Updated: Regularly update your OS and firmware to benefit from the latest features and security patches.
- Explore Dual Displays: Take advantage of the dual 4K HDMI outputs for multitasking or media projects.
- Experiment with Overclocking: If you need even more speed, you can overclock the CPU up to 3.0 GHz, but keep in mind that this can void your warranty and requires effective cooling.
- Expand with Accessories: The Pi 5 supports a range of HATs, cameras, and displays. Mix and match to suit your project needs.
Frequently Asked Questions (FAQ)
Q: Can I use my old Raspberry Pi 4 power supply?
A: While the Pi 5 can run on a 5V/3A supply for basic tasks, the official 5V/5A supply is recommended for reliable performance, especially with demanding peripherals.
Q: What operating systems are compatible?
A: Raspberry Pi OS is the most popular, but you can also use Ubuntu, specialized emulators, or other Linux distributions. Always check for Pi 5 compatibility.
Q: How do I connect two displays?
A: Use both micro-HDMI ports to connect up to two 4K monitors simultaneously—perfect for productivity or media projects.
Q: Is overclocking safe?
A: Overclocking is possible (up to 3.0 GHz), but it increases heat and may affect stability. Always use adequate cooling and proceed with caution.
Q: Can I boot from an SSD?
A: Yes, the Pi 5 supports booting from high-speed M.2 SSDs via the PCIe interface, offering much faster performance than micro SD cards.
Q: What should I do if my Pi 5 doesn’t boot?
A: Check the power supply, re-image the SD card, and ensure all connections are secure. Refer to the official documentation for troubleshooting LED codes
Final Thoughts
The Raspberry Pi 5 delivers a massive leap in performance and versatility. With the right setup and a few essential tips, you’ll unlock its full potential for everything from desktop computing to advanced DIY projects. Dive in, experiment, and let your creativity lead the way!
If you have more questions or want to share your projects, join the vibrant Raspberry Pi community and keep exploring new possibilities