Introduction
Pixelmator Pro, have you ever looked at a stunning digital image and wondered, “How did they do that?” Perhaps you have a photo that’s almost perfect but needs a quick crop or a color tweak. Maybe you need to design a flyer for your upcoming bake sale or create a sleek graphic for your website. For a long time, professional graphic design software felt like an exclusive club, with expensive memberships and a steep learning curve.
Additionally, then came Pixelmator Pro. This powerful, intuitive, and surprisingly affordable application for Mac has completely changed the game. It puts immense creative power right at your fingertips, whether you’re a complete beginner or a seasoned photographer looking for a more streamlined workflow.
But where do you even begin with such a feature-rich program? Don’t worry; you don’t need to be a professional designer to start creating beautiful work. Moreover, this guide will walk you through everything you need to know to open Pixelmator Pro with confidence and begin your creative journey. Then, we will explore its interface, master its core tools, and unlock some of its most magical features—all while speaking in plain, simple English.
First Steps: Downloading and Setting Up Your Canvas in Pixelmator Pro
First, you need to get the software. Head to the Mac App Store, search for Pixelmator Pro, and download it. The one-time purchase is a breath of fresh air in a world of monthly subscriptions.
Now, open the application. You are greeted by a sleek, dark interface that puts your work front and center. To start a new project, click on File > New (or press Cmd + N). This action opens a crucial dialog box: the New Document window.
Here, you define your canvas—the digital space where you’ll create your masterpiece. You can choose from a plethora of preset sizes for common tasks like an A4 document, a web banner, or an iPhone wallpaper. Alternatively, you can set a custom width and height. Remember to check the resolution; 72 PPI is standard for web graphics, while 300 PPI is ideal for print projects. Once you’re happy with your settings, click Create.
Navigating the Pixelmator Pro Interface: Your Digital Workshop
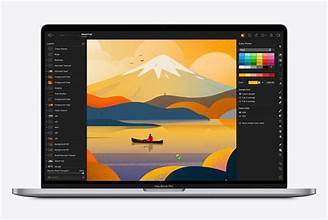
Before we dive into the tools, let’s take a quick tour of your new digital workshop. The interface is thoughtfully designed and can be broken down into a few key areas:
If you want to read about Wireframe, click here.
Firstly, The Tools Palette:
- You will find this on the far left side of your screen. This vertical strip houses all your essential instruments—the Move tool, Selection tools, Brush tool, Text tool, and many more. Simply click one to select it.
Secondly, the Options Bar:
- This context-sensitive bar sits at the very top of your screen. Its contents change dynamically based on which tool you have selected. For example, if you choose the Brush tool, the Options Bar will show settings for brush size, hardness, and opacity.
Thirdly, the Layers Panel:
- This is arguably the most important panel in any design application, and you’ll find it on the right side of the screen. Think of layers as transparent sheets of glass stacked on top of each other. You can paint on one, place a photo on another, and add text on a third. This non-destructive method allows you to edit each element independently without affecting the others.
Fourthly, the Color Panel:
- Also on the right, you’ll find your color picker. Then, this is where you choose the colors for your brushes, shapes, and text. You can select colors from a wheel, sliders, or palettes.
Then, the Effects & Adjustments Browser: Pixelmator Pro
- This is where the magic happens. Click the double-circle icon in the top-right corner to open a sidebar filled with stunning effects, color adjustments, and machine learning-powered tools.
Moreover, familiarizing yourself with these areas is your first major step toward mastery. Now, let’s get our hands dirty with some actual tools.
Core Tools and Techniques: The Foundation of Your Creativity
1. Working with Layers: The Backbone of Design
We mentioned layers earlier, but their importance cannot be overstated. Always be aware of which layer you have selected in the Layers Panel (it will be highlighted in blue). To add a new layer, click the plus (+) button at the bottom of the panel.
Additionally, you can rearrange layers by dragging them up and down the stack. Layers at the top of the list appear in front of layers below them. You can also hide a layer by clicking the eye icon next to it, or delete it by selecting it and pressing the Delete key.
2. Making Selections: Telling Pixelmator Where to Work
Often, you don’t want to affect your entire image. You might want to brighten just a face or apply an effect to just the sky. This is where selection tools come in. Pixelmator Pro offers a fantastic set:
Auto Select:
- Firstly, this is a phenomenal time-saver. Click the Wand icon and then click on an area of your image. Pixelmator’s machine learning will intelligently select objects like people, skies, and water automatically.
Free Select
- (Lasso Tool)Secondly, this tool allows you to draw a freehand selection around any area.
Rectangular and Elliptical Select:
- Thirdly, perfect for selecting geometric shapes.
Once you make a selection, a marching ants outline will appear. Any edit you make, painting, applying effects, or color corrections, will now be confined to that selected area.
3. The Brush Tool with Pixelmator Pro: Painting and Retouching
The Brush tool is your digital paintbrush. Select it from the Tools Palette (or press B). Now, look at the Options Bar. You can adjust the size, hardness, and opacity of your brush.
But the real power lies in the Brush Panel. Then, click the brush icon in the Options Bar to open it. Here, you can choose from a massive library of preset brushes, from realistic pencils and watercolors to special effects. You can even create and save your own custom brushes.
Moreover, pro tip: Use a soft, low-opacity brush for subtle retouching like skin softening. Use a hard, high-opacity brush for painting and drawing.
4. Pixelmator Pro The Text Tool: Adding Words to Your World
Adding text is simple. Select the Text tool (press T), click on your canvas, and start typing. Then, the Options Bar and the Text Panel (accessible via the icon in the Options Bar) give you full control over fonts, sizes, alignment, spacing (kerning and leading), and color.
Moreover, you can easily create stunning text effects by applying layer styles like shadows, strokes, and glows from the Effects browser.
5. Color Adjustments: Making Your Images Pop
This is where Pixelmator Pro truly shines. Instead of just offering simple sliders, it provides a suite of powerful, non-destructive adjustment layers. Go to Layer > New Adjustment Layer and choose an option.
- Color Balance: Firstly, correct color casts or create stylistic looks by tweaking the shadows, midtones, and highlights.
- Levels/Curves: Secondly, for precise control over the tonal range and contrast of your image. This is a professional-grade tool made accessible.
- HSL: Thirdly, it allows you to adjust the Hue, Saturation, and Luminance of specific color ranges. Want to make the blues in the sky more vibrant without affecting the green grass? This is the tool you need.
Because these are adjustment layers, you can edit or remove them at any time, and you can use layer masks to apply them only to specific parts of your image.
Advanced Magic: ML Enhance, Repair, and Effects
Pixelmator Pro is packed with intelligent features powered by machine learning (ML). These tools automate complex tasks with astonishing results.
- ML Enhance: Find this in the Effects browser under “Color Adjustments.” With one click, it intelligently analyzes your photo and applies a perfect blend of adjustments to brightness, contrast, saturation, and sharpness. It’s an incredible starting point for any photo edit.
- Repair Tool: This is a modern version of the classic clone stamp. Use it to remove unwanted objects—power lines, photobombers, blemishes. Simply brush over the object you want to remove, and Pixelmator Pro will seamlessly fill the area by sampling the surrounding pixels.
- Super Resolution: Then, under the Image > Enhance menu, this feature can double the dimensions of your image using ML, recovering stunning detail from a smaller photo. It’s perfect for enlarging old photos or cropped images.
- Style Transfer: Under “Effects” in the browser, you can apply the characteristics of famous art styles (like Van Gogh’s Starry Night or Munch’s The Scream) to your own photos. It’s a fun way to create unique artistic interpretations.
Bringing It All Together: A Simple Workflow
Let’s apply what we’ve learned to a real-world example: enhancing a landscape photo.
- Open Your Photo: Drag and drop your image onto the Pixelmator Pro icon.
- Crop and Straighten: Use the Crop tool (C) to improve the composition and straighten the horizon.
- ML Enhance: Apply the ML Enhance effect as a base correction.
- Select the Sky: Use the Auto Select tool to quickly and perfectly select the sky.
- Enhance the Sky: Add a “Levels” adjustment layer. It will automatically come with a mask limited to your selection. Adjust the sliders to darken the blues and make the clouds more dramatic.
- Add Text: Select the Text tool and add a title. Choose a font and use the Effects browser to add a subtle drop shadow to make it pop.
- Export: When you’re done, go to File > Export (
Cmd + Shift + E). Choose your format (JPEG for web, PNG for transparency, TIFF for print) and save your final creation.
Conclusion: Your Creative Journey Starts Now
Pixelmator Pro is more than just a Photoshop alternative; it’s a thoughtfully designed, powerful, and joyful application that empowers Mac users to create beautiful graphics. Its combination of traditional, precise tools with groundbreaking machine learning features makes it accessible for beginners and powerful enough for professionals.
The best way to learn is by doing. Don’t be afraid to experiment. Click on every tool, slide every slider, and apply every effect. Make mistakes. That’s how you discover hidden gems and develop your own unique workflow. You have a world-class digital studio at your command. Now, go out there and create something amazing.
Frequently Asked Questions (FAQ)
Q: Is Pixelmator Pro a subscription, or do I buy it once?
A: You buy it once. Pixelmator Pro is available for a single, one-time purchase on the Mac App Store. This is a major advantage over many other professional-grade applications that require ongoing monthly payments.
Q: Can I use Pixelmator Pro on my iPad?
A: Pixelmator Pro is specifically designed for macOS. However, the team makes a separate, equally excellent app called Pixelmator (without the “Pro”) for iPadOS and iOS. It’s also a one-time purchase and is optimized for touch interfaces and the Apple Pencil.
Q: How does it compare to Adobe Photoshop?
A: Pixelmator Pro is a fantastic competitor. It covers about 90% of what most photographers and designers use Photoshop for, including layers, masks, advanced selections, and RAW photo editing. It lacks some extremely niche, advanced features like 3D text rendering but makes up for it with a cleaner interface, better performance on Apple silicon Macs, and its unique ML-powered tools. For most users, it is more than capable.
Q: Does it support Photoshop (PSD) files?
A: Yes, it does. You can open, edit, and save files in the PSD format. Layer compatibility is generally very good, making it feasible to switch between Pixelmator Pro and Photoshop if you need to collaborate.
Q: What is the learning curve like for a complete beginner?
A: The learning curve is significantly gentler than that of other professional design apps. The interface is clean and intuitive. The machine learning tools (like Auto Select and ML Enhance) provide instant, impressive results that encourage experimentation. Beginners can achieve great results quickly, while still having a deep toolset to grow into.
Q: Where can I find tutorials and learn more?
A: The Pixelmator Team has an excellent official Tutorials section on their website, complete with articles and video guides. Furthermore, a quick search on YouTube will reveal thousands of community-created tutorials covering everything from basic edits to advanced design techniques.