How to Use GitLab: A Beginner’s Guide to DevOps
GitLab Welcome to the exciting world of DevOps, where development and operations come together to create faster, more reliable software. If you are just starting your journey, the array of tools available might seem overwhelming.
However, one platform consistently stands out for its comprehensive and unified approach: GitLab. It is more than just a place to store your code; it is a complete DevOps platform that can handle your entire software development lifecycle. Therefore, this guide will walk you through exactly how to use GitLab, turning you from a complete beginner into someone who can confidently navigate its core features.
Introduction: What is GitLab and Why Should You Care?
Fundamentally, GitLab is a web-based DevOps platform that uses Git for repository management. Nevertheless, its true power lies in its integration. Instead of piecing together separate tools for version control, continuous integration, and project management, GitLab offers them all in one place. Consequently, it streamlines collaboration, boosts automation, and provides complete visibility into your project from start to finish.
Whether you are a solo developer or part of a large team, learning how to use GitLab is an invaluable skill. Then, it helps you catch bugs early, enforce code quality standards, and deploy applications with confidence. So, let’s roll up our sleeves and get started.
If you want to read about Git hub, click here.
GitLab Step 1: Getting Started – Setting Up Your Account and Project
First things first, you need an account. You can sign up for a free account at GitLab.com, or your organization might have its own self-managed instance.
Creating Your First Project
Once you are logged in, the dashboard is your command center. To begin, you should create a new project to house your code.
- Firstly, click the “New project” button: You will usually find this on your dashboard or by clicking the plus icon (+) in the top navigation bar.
- Secondly, choose “Create blank project”: This is the simplest option for starting fresh.
- Thirdly, fill in the details:
- Project name: Give it a clear, descriptive name, like
my-first-app. - Project slug: This auto-generates from the name and becomes part of your project’s URL.
- Visibility Level: Then, you can choose between Private (only you and invited members can see it), Internal (authenticated users can see it), or Public (anyone on the internet can see it). For learning, Private is a safe choice.
- Project name: Give it a clear, descriptive name, like
- Finally, click “Create project”: Congratulations, you now have a GitLab repository!
Step 2: Mastering Version Control – Your Code’s Best Friend
Version control is the cornerstone of modern development, and GitLab excels at it. Then, this section covers the essential workflows you will use daily.
Cloning Your Repository
To work with your code locally, you need a copy, or “clone,” on your computer. GitLab provides the URL. Open your terminal and run:
git clone https://gitlab.com/your-username/my-first-app.git
cd my-first-app
The Branching Workflow
One of the best practices in Git is to never commit directly to the main branch. Instead, you create branches for new features or bug fixes. Then, this keeps the main line of development stable. You create a branch to isolate your work.
git checkout -b my-new-featureThis command creates and switches you to a new branch called my-new-feature. Now, you can safely make changes to your code.
Committing and Pushing Changes
After you have made some changes (for example, editing the README.md file), you need to commit them. A commit is like a snapshot of your project at a specific point in time. Then, you commit your changes with a clear message.
git add README.md
git commit -m "Update README with project description"
Finally, you push your local branch to the remote repository on GitLab so others can see it. You push your branch to the remote repository to share your work.
git push origin my-new-featureThe Magic of Merge Requests
After pushing your branch, you will likely want to integrate your changes into the main branch. This is where Merge Requests (MRs) come in. An MR is a request to merge code from one branch into another, and it is the heart of collaboration in GitLab.
- Firstly, after pushing, GitLab often displays a link to create a Merge Request. Alternatively, you can go to the “Merge Requests” section of your project and click “New merge request.”
- Secondly, select your source branch (
my-new-feature) and your target branch (main). - Thirdly, give your MR a title and a description of what your changes do.
- Then, you can also assign it to a teammate for review, tag a reviewer, and link it to an issue.
Merge Requests allow for code review, discussion, and automated testing before the changes ever touch the main branch, ensuring high code quality.
Step 3: Automating with CI/CD – The Heart of DevOps
Now we arrive at the feature that truly sets GitLab apart: its built-in CI/CD (Continuous Integration and Continuous Delivery/Deployment). CI/CD automates the process of testing and deploying your code. You configure your CI/CD pipeline to automate testing and deployment.
The Star of the Show: The .gitlab-ci.yml File
The entire CI/CD pipeline is defined by a single file placed in the root of your repository: .gitlab-ci.yml . Then, this YAML file is your instruction manual for GitLab on what to do every time you push code.
Understanding the Basics: Stages and Jobs
Let’s break down a simple example:
stages:          # List of stages in the pipeline
  - build
  - test
  - deploy

build-job:       # This is a job
  stage: build   # This job belongs to the 'build' stage
  script:
    - echo "Compiling the code..."
    - echo "Creating a build artifact."

test-job:        # This is another job
  stage: test    # This job belongs to the 'test' stage
  script:
    - echo "Running unit tests..."
    - echo "Running integration tests..."

deploy-job:      # This is a third job
  stage: deploy  # This job belongs to the 'deploy' stage
  script:
    - echo "Deploying application to staging server..."
In this configuration, you define three stages: build, test, and deploy . GitLab runs these stages in order. The build stage must be completed successfully before the test stage begins, and so on.
Each stage can have one or more jobs. Here, each stage has a single job (e.g., build-job), script. Then, the keyword defines the shell commands that the job will run. Then, you can see how easy it is to define your automation workflow.
Running the Pipeline
Once you commit this .gitlab-ci.yml file to your repository, GitLab automatically triggers the pipeline. You can watch its progress live by navigating to Build > Pipelines in your project sidebar. If a job fails, you can click on it to view the detailed console log and debug the issue immediately.
Step 4: A Practical Workflow Example
To tie everything together, let’s imagine a typical day in the life of a developer using GitLab.
- Firstly, you start your day by pulling the latest
mainbranch and creating a new feature branch:git checkout -b user-login. - Secondly, write code for the new login feature, making several commits along the way.
- Thirdly, push your branch to GitLab:
git push origin user-login. - Then, you create a Merge Request for
user-logintargetingmain. You ask a colleague to review it. - The CI/CD pipeline triggers automatically because of the
.gitlab-ci.ymlfile in the repository. It runs a build job and a test job on your code. - Your colleague reviews the code, leaves a comment asking for a small change, and approves it after you fix it.
- Once the pipeline passes and the review is approved, you merge the Merge Request.
- Finally, the merge triggers a new pipeline on the
mainbranch. This time, after the build and test stages succeed, adeployjob runs, automatically deploying the updated application to a staging environment.
This entire workflow is efficient, transparent, and automated, thanks to GitLab.
Conclusion: Your DevOps Journey Starts Now
Learning how to use GitLab is a journey, but mastering its fundamentals, version control with branches and merge requests, and automation with CI/CD pipelines, will fundamentally improve how you build software. As you have seen, GitLab brings everything together in one place, eliminating the friction of switching between disparate tools.
Therefore, do not wait. Create a project, experiment with branches, and try writing a simple .gitlab-ci.yml file. The best way to learn is by doing. Welcome to a smarter, more efficient way to develop software.
Frequently Asked Questions (FAQ)
1. What exactly is the difference between Git and GitLab?
Git is the version control system itself, the underlying technology that tracks changes to your files. Then, GitLab is a web-based platform that hosts your Git repositories and adds many extra features on top, like issue tracking, a GUI for managing branches, and, most importantly, a built-in CI/CD system for automation.
2. Is GitLab free to use?
Yes, GitLab offers a very generous free tier. You can create unlimited private and public repositories, add unlimited collaborators, and use 400 CI/CD minutes per month. Then, this makes it an excellent choice for individuals, students, and small teams.
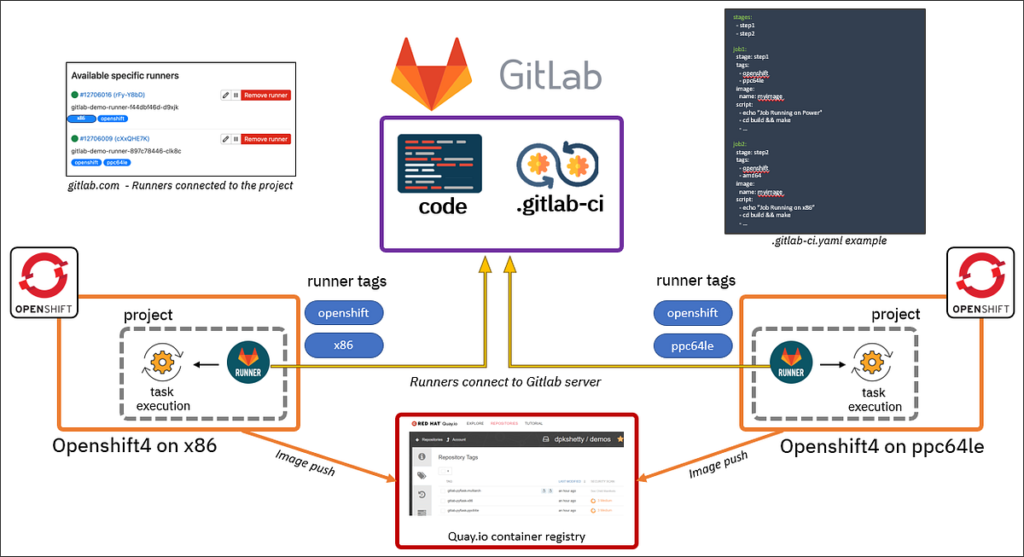
3. What is a GitLab Runner?
A GitLab Runner is a lightweight, highly scalable agent that picks up and executes the CI/CD jobs defined in your .gitlab-ci.yml file. Then, you can install runners on your own infrastructure, or use the shared runners provided for free by GitLab. Think of it as the worker who actually does the building, testing, and deploying.
4. My pipeline failed. What should I do?
Do not worry; failure is a part of the process! GitLab makes debugging easy. Simply go to Build > Pipelines and click on the failed job. Then, you will see the complete console log output. Scroll through the log to find the error message—it will usually tell you exactly what went wrong, such as a syntax error in your code or a failing test.