Introduction
In today’s digital world, online privacy is more important than ever. Whether you want to access geo-restricted content, protect your data on public Wi-Fi, or simply browse anonymously, a free VPN can be a handy tool. But before you jump in, there are key things you need to know—like how to use one safely, what risks to avoid, and which are trustworthy.
Additionally, this guide will walk you through how to use a free VPN effectively, what to watch out for, and answer common questions to help you stay secure online.
Why Use a Free VPN?
Firstly, let’s understand why people turn to free VPNs:
Firstly, Bypass Geo-Restrictions – Access blocked websites, streaming services, or social media platforms.
Secondly, Public Wi-Fi Security – Encrypt your connection on unsecured networks (like cafes or airports).
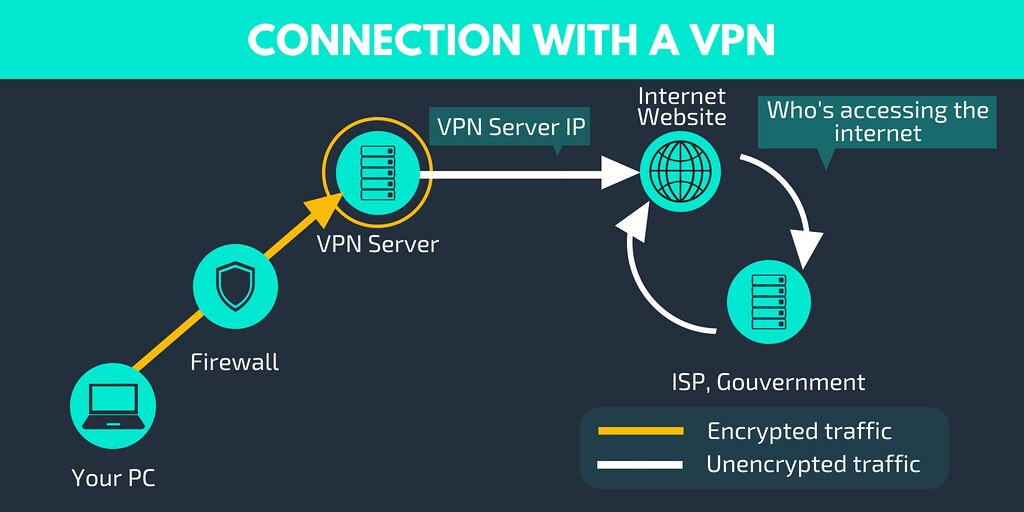
Thirdly, Basic Privacy Protection – Hide your IP address from trackers and advertisers.
However, not all VPNs are safe. Some log your data, bombard you with ads, or even sell your information. That’s why knowing how to choose and use one properly is crucial.
How to Use a Free VPN (Step-by-Step Guide)
Step 1: Choose a Reliable Free VPN
Not all are equal. Look for providers with:
No-logs policy (they don’t track your activity)
Strong encryption (AES-256 is the gold standard)
Decent speed & server options (some limit bandwidth)
Top Free VPNs to Consider:
- ProtonVPN (unlimited data, strong security)
- Windscribe (10GB/month, good speeds)
- TunnelBear (limited data but user-friendly)
⚠ Moreover, avoid shady VPN, which have been caught selling user data.
If you want to read about Keeper vs. Dashlane, click here.
Step 2: Download & Install the VPN
- Firstly, go to the official website (avoid third-party stores).
- Secondly, download the app for your device (Windows, Mac, Android, iOS).
- Thirdly, install and launch the app.
Step 3: Connect to a Server
- Firstly, open the VPN app.
- Secondly, select a server location (choose nearby for faster speeds).
- Then, click “Connect”—you’re now browsing securely!
Step 4: Adjust Settings for Better Security
For extra protection:
Enable kill switch (cuts internet if VPN disconnects).
Use WireGuard or OpenVPN protocols for better speed & security.
Then turn on ad & malware blockers if available.
Step 5: Test Your VPN for Leaks
Visit ipleak.net or dnsleaktest.com to ensure your real IP isn’t exposed.
Risks of Using a Free VPN (What You Need to Know!)
While these are convenient, they come with potential downsides:
Data Logging – Firstly, some track & sell your browsing history.
Slow Speeds – Secondly, free servers are often overcrowded.
Bandwidth Limits – Many impose monthly caps (e.g., 2GB-10GB).
Ads & Malware – Then, some inject ads or even contain spyware.
Moreover, Pro Tip: If privacy is critical, consider a paid VPN like NordVPN or Surfshark—they offer better security and unlimited data.
FAQ: Free VPN Questions Answered
1. Is it safe?
Some are, but many aren’t. Stick to trusted providers like ProtonVPN or Windscribe, which have strong privacy policies.
2. Can I use it for Netflix?
Most free VPNs won’t work with Netflix due to VPN blocks. Then, paid VPNs are more reliable for streaming.
3. Does it slow down my internet?
Yes, free VPNs often have slower speeds due to limited server options.
4. Can I get hacked using a free VPN?
If the VPN is malicious, yes. Always research before downloading.
5. Is Tor better than a free VPN?
Tor provides strong anonymity but is much slower. A VPN is better for daily browsing & streaming.
Final Thoughts: Should You Use a Free VPN?
It can be useful for light, temporary use, but they’re not ideal for long-term privacy. If you frequently need a VPN, investing in a low-cost premium service is a smarter choice.
Key Takeaways:
Use trusted free VPNs (ProtonVPN, Windscribe).
Avoid logging, ads, and bandwidth limits.
Then test for leaks and enable security features.
For heavy use, upgrade to a paid VPN.
By following these steps, you can safely browse the web without compromising your privacy. Stay secure!