Introduction
factory reset Lenovo ThinkPad X1 Carbon can be a straightforward process, whether you’re preparing to sell it, troubleshooting issues, or simply wanting a fresh start. Then, this guide will explore how to factory reset your Lenovo ThinkPad X1 Carbon step by step. Let’s dive in!
Understanding factory reset on Lenovo ThinkPad
A factory reset is a process that restores your laptop to its original factory settings. Moreover, this means all data, applications, and personal settings will be erased. Before proceeding, you must back up any important files you want to keep. You can use an external hard drive or cloud storage for this purpose.
Preparing for the factory reset on the Lenovo ThinkPad
Before starting the factory reset Lenovo ThinkPad x1 process, ensure your laptop is charged or plugged into a power source. Moreover, a sudden shutdown during the reset can lead to complications.
Steps to Back Up Your Data
Step 1: Plug In Your Backup Drive
- Use any USB flash drive or external hard drive
- Make sure it has enough space for your files
- Check by right-clicking the drive > “Properties”
Step 2: Copy Your Important Files
- Firstly, open File Explorer
- Secondly, drag and drop these folders:
- Documents
- Pictures
- Desktop files
- Then, downloads (check for important items)
- Don’t forget:
- Save game progress (if any)
- Then, export browser bookmarks
Pro Tip: Double-click the drive after copying to verify your files are there!
Step 3: Try Cloud Storage Too
For extra safety:
☁️ Google Drive/Dropbox:
- Right-click files > “Share” > “Save to Drive”
📱 OneDrive (Windows built-in): - Just drag files to your OneDrive folder
Why Both?
- USB = Fast restore
- Cloud = Protection if the drive gets lost
You’re Ready!
Firstly, files are safe on a USB
Secondly, an optional cloud copy was made
Now you can safely reset
How to Factory Reset the Lenovo ThinkPad
Method 1: Using Windows Settings
If your laptop is operational and you can access Windows, follow these steps:
- Firstly, Open Settings
- Secondly, Go to Update & Security
- Look for the circular arrow icon
- Click it to continue
- Thirdly, Choose Recovery Options
- Select “Recovery” from the left menu
- Find the “Reset this PC” section
- Then, Start the Reset Process
- Click the “Get Started” button
- Then, pick either:
- ❌ Remove everything (Full clean reset)
- 💾 Keep my files (Saves documents/pictures)
- Finish Up
- Firstly, read the warnings carefully.
- Secondly, click “Reset” to begin.
- Then, your PC will restart automatically.
Method 2: Lenovo ThinkPad: Using Recovery Mode
If your laptop is not functioning correctly or you cannot access Windows, you can use recovery mode:
- Restart Your Laptop
- Open Recovery Menu
- When you see the Lenovo logo
- Keep pressing F11 fast until the menu appears
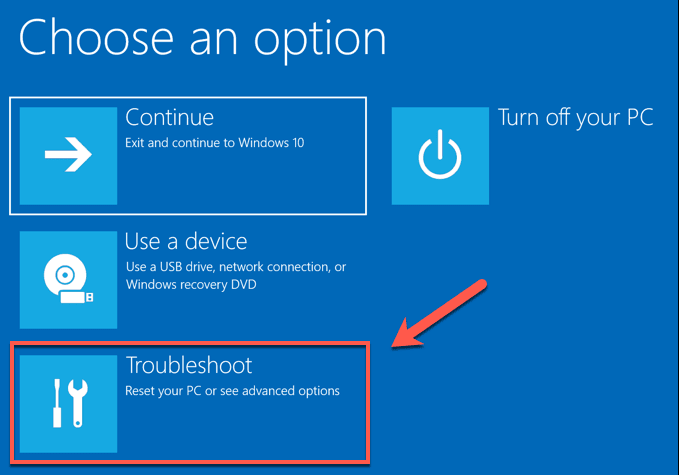
- Pick Troubleshoot
- Use the arrow keys to select it
- Press Enter
- Choose the Reset Option
- Select “Reset this PC.”
- Then pick:
- “Remove everything” (Full clean reset)
- “Keep my files” (Saves your photos/documents)
- Start the Reset
- Firstly, read the warnings
- Secondly, click Confirm to begin
- Then, your laptop will restart automatically
- Tips:
- Plug in your charger first
- Back up important files just in case
- Be patient – it can take over an hour
Method 3: Using a Bootable USB Drive
If none of the above methods work, creating a bootable USB drive with Windows installation media can help:
Still stuck? Making a Windows USB installer might fix your problem. Here’s how:
- Make the USB Installer
- Grab a working computer
- Download Microsoft’s Media Creation Tool
- Run it and pick “Create installation media.”
- Then, choose your USB drive when asked
- Boot From the USB
- Plug the USB into your ThinkPad
- Restart your laptop
- Mash the F12 key as it starts up
- Then, pick your USB from the menu
- Install Windows Fresh
- The installer will walk you through
- Warning: This will erase everything on your laptop!
- Just follow the steps – Then, it’s like setting up a new computer
Helpful Tips:
Use at least an 8GB USB stick
Back up your files first if possible
Plug in your charger during installation
Then, be patient – it might take a while
Post-Reset Steps about Lenovo ThinkPad
After successfully resetting your Lenovo ThinkPad X1 Carbon:
- Set Up Windows Again: Follow the setup prompts as if it were a new device.
- Then, Restore Your Data: Reconnect your external drive or cloud storage and transfer back any necessary files.
Troubleshooting Common Issues
If you encounter problems during or after the reset:
- Ensure that all cables are securely connected and that there’s enough power supply.
- If recovery options are not accessible, consider using Lenovo’s support tools or forums for assistance.
Conclusion
Resetting your laptop can fix problems or get it ready for someone else. Follow these easy steps to do it safely.
Lenovo Thinkpad Before You Begin:
Back up your files (save photos, documents, etc.)
Plug in your charger (don’t let the battery die mid-reset)
Then, have 1-2 hours free (it takes time)
Two Easy Ways to Reset:
1. Use the Built-in Reset Option (Easiest)
- Go to Settings > Update & Security > Recovery
- Click “Reset this PC.”
- Then, choose “Keep my files” or “Remove everything.”
2. Use a USB Drive (If the First Method Fails)
- Borrow another computer to make a Windows USB installer
- Then, boot from it and follow the setup steps
After Resetting:
- Firstly, install Windows updates immediately
- Secondly, set up antivirus protection
- Then, restore your backed-up files
Pro Tip: Write down your Wi-Fi password first, you’ll need it after resetting!