Introduction
Autodesk Maya is a powerful 3D modeling, animation, and rendering software used by professionals in film, gaming, and VFX. Whether you’re a beginner or looking to refine your skills, mastering it requires practice and the right techniques. In this guide, we’ll walk you through essential tips to help you navigate it efficiently.
Additionally, it is a top 3D software for animation, modeling, and visual effects. Learning it can feel overwhelming at first. But don’t worry! This guide breaks down the must-know tips in simple terms. You’ll learn how to navigate it, speed up your workflow, and create stunning 3D art.
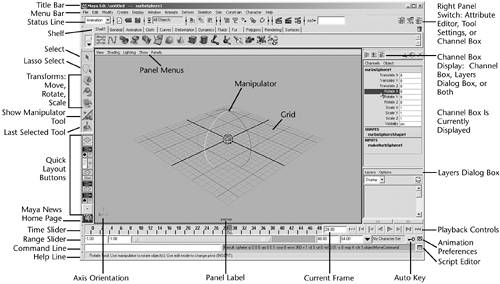
1. Getting Comfortable With Maya‘s Layout
Firstly, let’s explore where everything is:
- Firstly, Viewport – Your main 3D workspace where you build models
- Secondly, Toolbar – Holds tools like Move, Rotate, and Scale
- Thirdly, Attribute Editor – Controls an object’s settings
- Then timeline – Used for animation keyframing
Quick Tip: You can drag panels around to customize your workspace. This helps you work faster!
If you want to read about JetBrains IDEs, click here.
2. Modeling Made Simple
Start With Basic Shapes
Most 3D models begin as simple cubes, spheres, or cylinders. From there, you can shape them into anything.
- Press Ctrl + E to extrude faces and add detail
- Use the Bevel tool to smooth sharp edges
- The Bridge tool connects separate parts
Maya Must-Know Shortcuts
Moreover, these will save you tons of time:
- W – Move objects
- E – Rotate objects
- R – Scale objects
- G – Repeat your last action
3. Texturing and UVs Without Stress
UV Mapping Basics
Before adding textures, you need to “unwrap” your model:
- Firstly, select your object
- Secondly, open the UV Editor (found in the Windows menu)
- Thirdly, use Automatic Mapping for tricky shapes
Adding Realistic Textures
- Firstly, open Hypershade to create materials
- Then, drag and drop image files right onto your model
4. Animation for Beginners
Keyframing Made Easy
- Firstly, select your character or object
- Secondly, press S to set your first keyframe
- Thirdly, move the timeline and change the pose
- Then, press S again to set another key
Smoother Movements
Moreover, open the Graph Editor to tweak your animation curves. Then, this helps movements look more natural.
5. Lighting and Rendering Tips
Simple Three-Light Setup
- Main light – The brightest light source
- Fill light – Softens harsh shadows
- Backlight – Makes your subject stand out
Rendering With Arnold
Maya’s built-in Arnold renderer makes great-looking images:
- Firstly, open Render Settings
- Then, Choose Arnold Renderer
- Increase samples for better quality
6. Keeping Maya Running Smoothly
- Use Reduce Mesh on complex models
- Freeze Transformations to clean up object positions
- Delete History regularly to speed up your scene
FAQs – Maya
Is Maya hard to learn?
It can be tricky at first, but it starts making sense with practice. Begin with simple projects before tackling advanced features.
Maya vs Blender – Which is better?
It is the industry standard for big studios. Blender is free and great for beginners. Maya has stronger animation tools.
Why is Maya running so slowly?
Try these fixes:
- Switch to wireframe view (Shading menu)
- Turn off unused plugins
- Use simpler versions of models when working
Can I use Maya for 3D printing?
Absolutely! Just make sure your model has no holes and export as.STL or.OBJ.
What are the best Maya add-ons?
- ZBrush Bridge for detailed sculpting
- MASH for cool motion effects
- RenderMan for high-end rendering
Final Thoughts
Maya is powerful, but you don’t need to learn everything at once. Start with these basics, practice regularly, and soon you’ll be creating amazing 3D work. Remember – every pro started as a beginner!
What part of Maya do you find most challenging? Share below! 🎨