Introduction
FL Studio is one of the most popular digital audio workstations (DAWs) for music producers, beatmakers, and sound designers. Whether you’re a beginner or an experienced producer, mastering FL Studio can take your music production skills to the next level.
Additionally, want to make music but feel overwhelmed? FL Studio is your perfect starting point. This easy guide walks you through everything, from opening the program for the first time to completing your first track. Let’s break it down step by step.
Getting Started: First Steps in FL Studio
1. Downloading and Installing
Head to Image-Line’s website to get FL Studio. Pick the version that fits your needs:
- Firstly, fruity Edition (basic beat making)
- Secondly, Producer Edition (full features)
- Thirdly, signature Bundle (extra plugins)
Moreover, installation takes just minutes. Once done, open the program and take a quick look around.
2. Setting Up Sound
Before making music, fix your audio settings:
- Firstly, click Options > Audio Settings
- Secondly, choose your audio device
- Thirdly, adjust buffer size (lower = less delay but more computer strain)
3. FL Studio: Starting Your First Project
Moreover, hit File > New to begin. Save immediately (Ctrl+S) – you don’t want to lose your work!
FL Studio’s Main Areas Explained Simply
1. Channel Rack (Your Instrument Hub)
This is where you add:
- Drum samples (drag and drop)
- Synths (click the + button)
2. Playlist (Your Song Builder)
Think of this as your song’s timeline. Then, drag patterns here to build verses, choruses, and bridges.
3. Piano Roll (Melody Maker)
Double-click any instrument to open this. Draw notes with your mouse or connect a MIDI keyboard to play live.
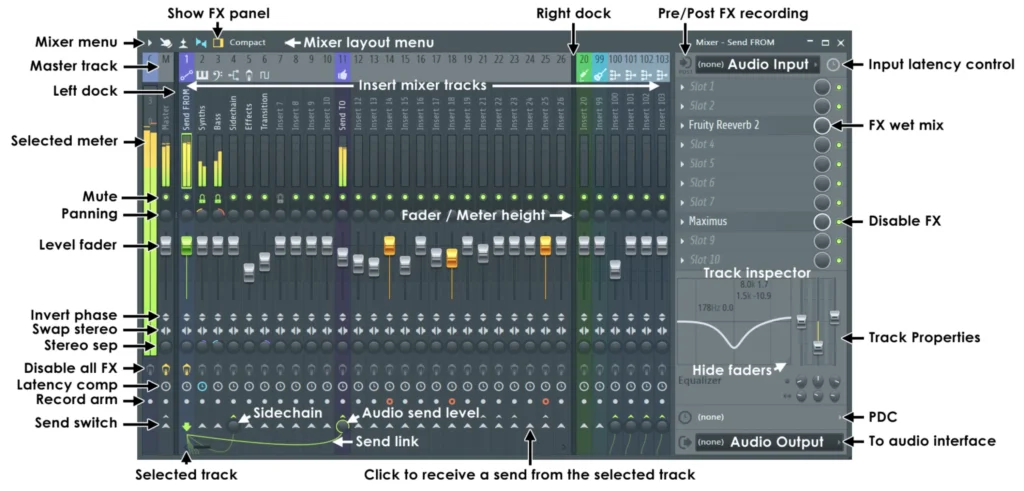
4. Mixer (Your Sound Shaper)
Then, press F9 to open it. Here you can:
- Firstly, adjust volumes
- Secondly, add effects like reverb
- Thirdly, make your track sound professional
FL Studio Making Your First Beat – Easy Steps
1. Adding Drums
Firstly, drag kick, snare, and hi-hat sounds into the Channel Rack. Then, it comes with great starter sounds.
2. Creating a Rhythm
Use the step sequencer (those little boxes) to program a simple:
- Kick on beats 1 and 3
- Snare on 2 and 4
- Hi-hats between them
3. Building a Melody
Try the “FLEX” plugin (included free):
- Firstly, click the + in Channel Rack
- Secondly, pick FLEX
- Thirdly, choose a preset you like
- Fourthly, draw notes in the Piano Roll
4. Putting It All Together
Drag your drum and melody patterns into the Playlist. Start with:
- 4-bar intro
- 16-bar verse
- 8-bar chorus
5. Making It Sound Pro
In the Mixer:
- Firstly, turn down loud sounds
- Secondly, add a little reverb to vocals
- Then, put Fruity Limiter on the master track
FL Studio Cool Tricks to Try Later
✅ Automation – Make sounds move by right-clicking knobs and choosing “Create Automation Clip”
🎤 Recording – Then, connect a mic and press the record button to capture vocals
💾 Saving Your Work – Export as MP3 when done (File > Export)
If you want to read about macOS, Click Here.
Answers to Common Questions about FL Studio
Q: Is FL Studio good for beginners?
A: Absolutely! Its pattern-based system makes learning easy.
Q: Can Mac users run FL Studio?
A: Yes! It works perfectly on both Windows and Mac.
Q: Why does my audio stutter?
A: Try increasing the buffer size in Audio Settings, or then, using ASIO drivers.
Q: Can I add more sounds?
A: Yes! FL Studio supports thousands of free and paid plugins.
FL Studio Final Tip
Finally, don’t try to learn everything at once. Master one feature each day. In a month, you’ll be making complete songs!
Remember, every professional started where you are now. Your first beats might sound simple, but keep going. Happy music making!